Manage Devices Using Edge Xpert Manager
You can add and manage devices in Edge Xpert Manager within the Devices pane. Find this by selecting DEVICES from the main menu.
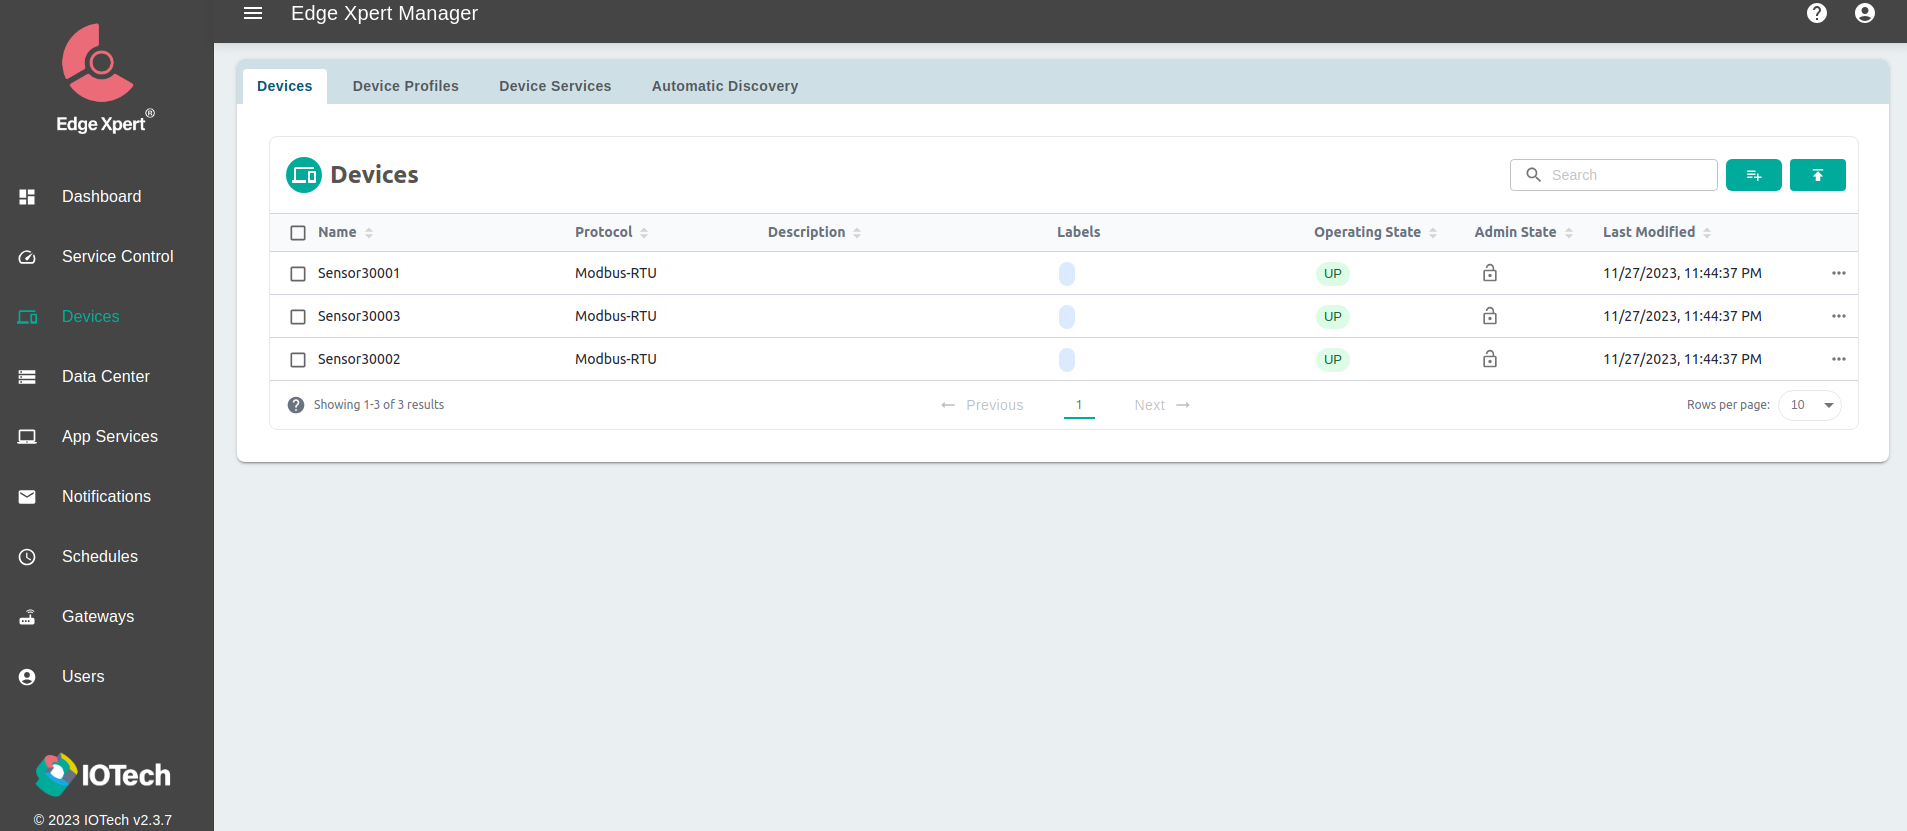
The Devices pane displays all devices that are currently configured and running in Edge Xpert. For example, when running the Virtual Device Service, you can view the simulated devices as below:
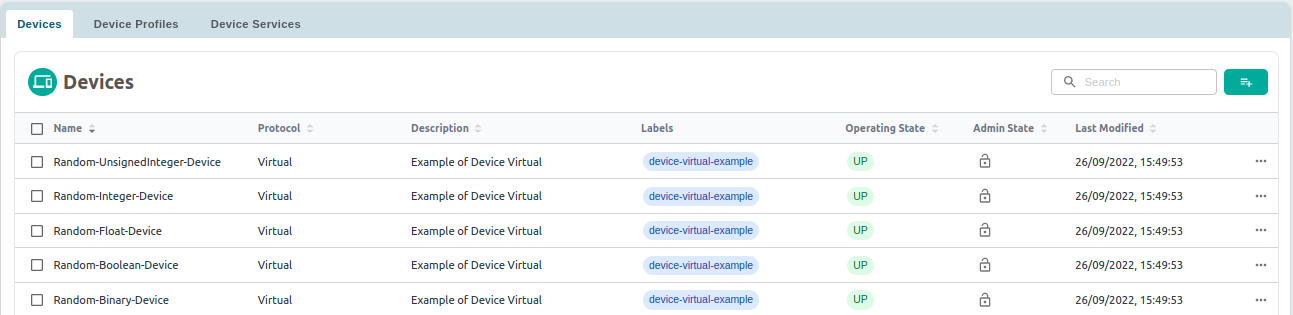
The following device properties are displayed:
- Name. The name of the device
- Protocol. The protocol of the device.
- Description. A description of the device.
- Operating State. The current operating state. This indicates whether the device is currently connected (green) or disconnected (red)
- Admin State. The current administrative state. This indicates whether the device is locked (
 ) or unlocked (
 ). If the device is locked, it becomes unresponsive
 - Last Modified. The date and time at which the device was last updated
You can search for specific devices using the Search box, a device is listed in the search results when a match is found in one of its fields.
Device Actions
Select the icons from the ACTION column for an existing device to view and manage the device, as follows:
- View Device
 Displays the metadata associated with the device
 - Edit Device
 Allows you to lock or unlock the device
 - Control Device
 Allows you to read from, and write data to, the device
 - Delete Device
 Allows you to delete the device
Add a Device using the Xpert Manager
You can add a device from the Devices pane of the Edge Xpert Manager using the steps described below.
Note
To add a device, you must first have a device profile uploaded to Edge Xpert. Find instructions for this in Add Device Profile
-
Select the Add Device
 icon. The Add New Device page displays
 -
Select the protocol of the device you wish to add. Once chosen, relevant fields used by the selected protocol will be displayed. In the following example, we selected OPC-UA:
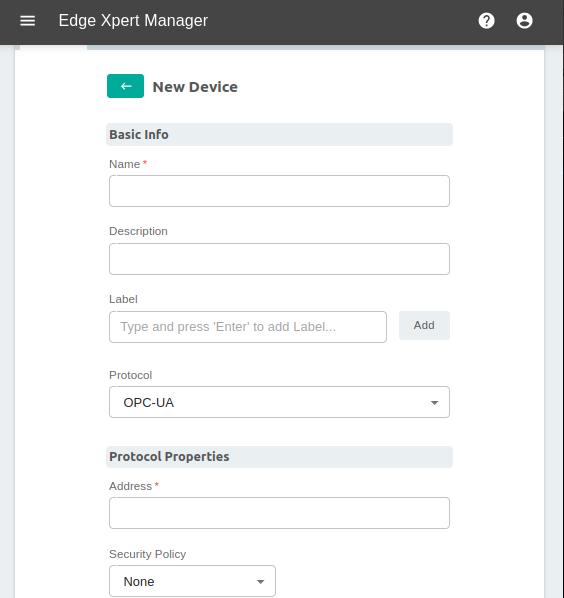
Info
If the protocol you require is not listed, select General. If you select General, a generic set of fields is displayed.
-
Enter all the required information. Example entries for each Device Service are provided in the Device Provisioning Examples
-
Select the appropriate Device Profile from the Device Profile drop-down menu
-
Select the appropriate Device Service from the Device Service drop-down menu. If the related Device Service is not found, deploy the Device Service first as described in Manage Device Services Using the Edge Xpert Manager
-
Define any Auto Events for collecting data from the devices. To do this, complete the following steps:
-
Click
 to add a new auto event rule
 -
Enter the interval you wish to have between events in the Interval text box.
For devices that must be polled, this is the time between queries. For devices that can push, this is the minimum interval between generated events (the rate limit). The schedule can be specified as defined by ISO 8601.
The following examples show how you can specify AutoEvents:
- The number of microseconds. For example, 30μs
- The number of milliseconds. For example, 300ms
- The number of seconds. For example, 10s
- The number of minutes. For example, 5m
- The number of hours. For example, 1h
- A combination of the above. For example, 1h10m10s
-
Set the ON CHANGE checkbox, as follows:
- To only report sensor data when changes are detected between intervals, check the checkbox
- To report all readings at the interval, uncheck the checkbox
-
From the Resource Name drop-down menu, select the name of the device resource or device command to be used in the event. These are specified in the device profile.
-
Select
 to add the auto event rule. Selecting
  will remove the auto event from the list.
-
-
Select the Save button to add the device. Selecting the Cancel button closes the page without adding the device.
Add multiple Devices using the Xpert Manager
Note
This feature is newly supported in Edge Xpert v2.3.7.
You can add multiple devices from the Devices pane of the Edge Xpert Manager using the steps described below. EdgeXpert now supports DBC and XLSX file format, which allows users to edit the details in the DBC and XLSX format first and upload to the Edge Xpert Manager.
Note
The device with the same name in the XLSX file will be overwritten after uploading to the xpert-manager.
- Select the Add Multiple
 icon. The Upload Device page displays
 - Upload your DBC or XLSX files to the Devices pane
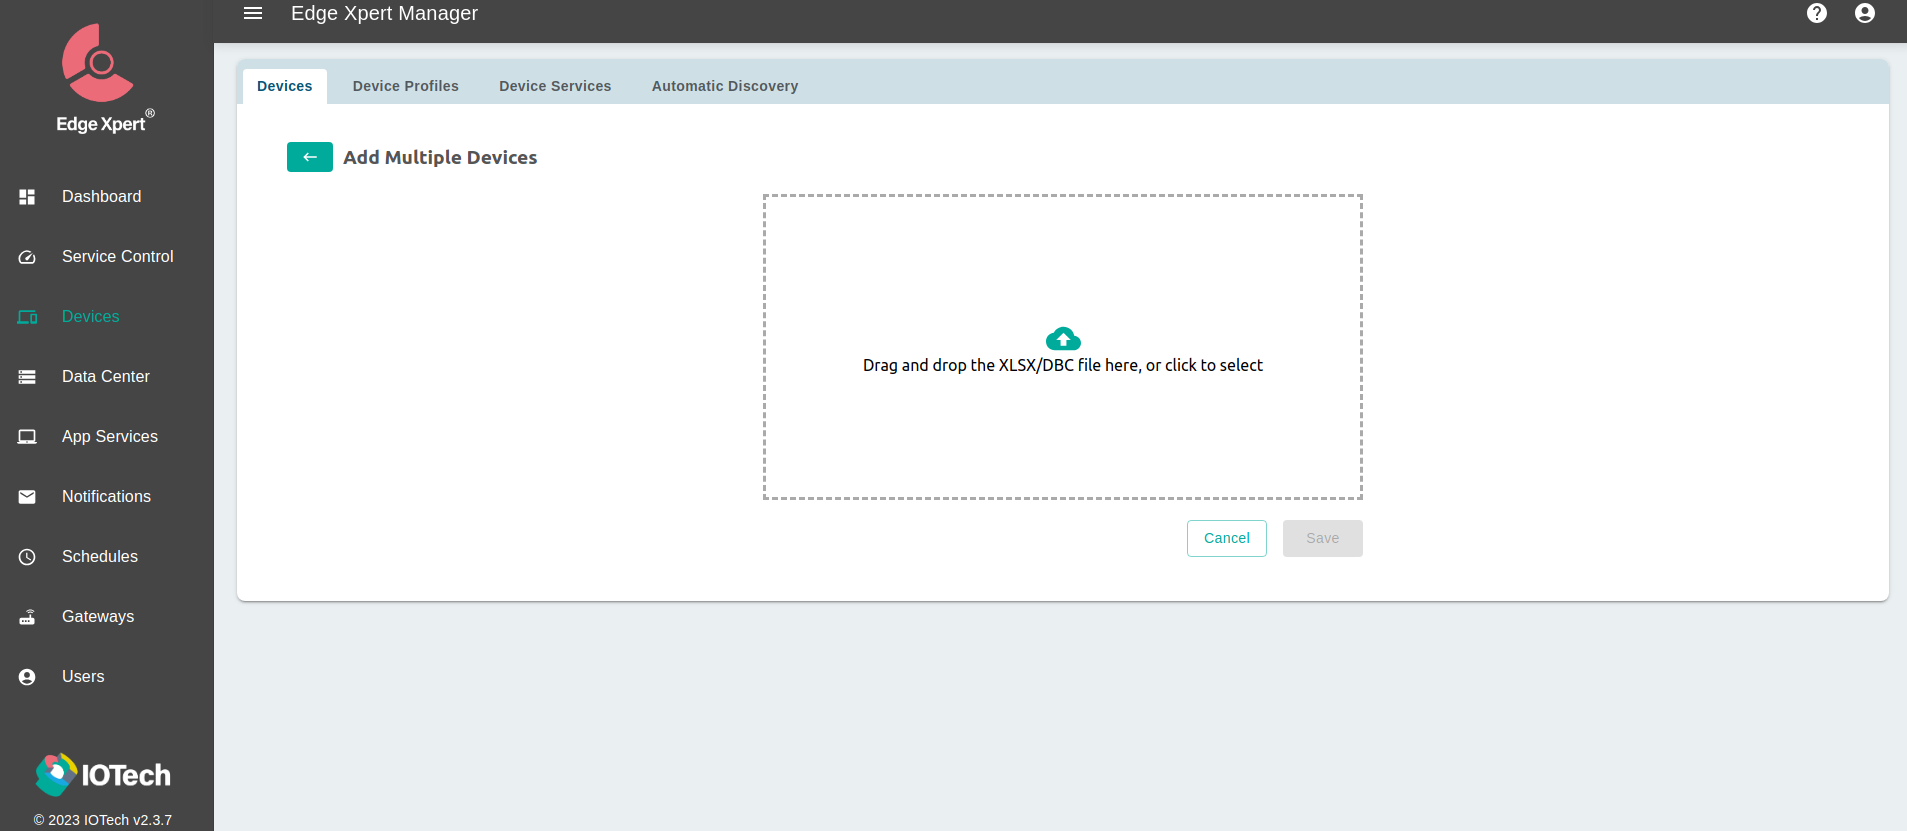
- The devices will be created as follows:
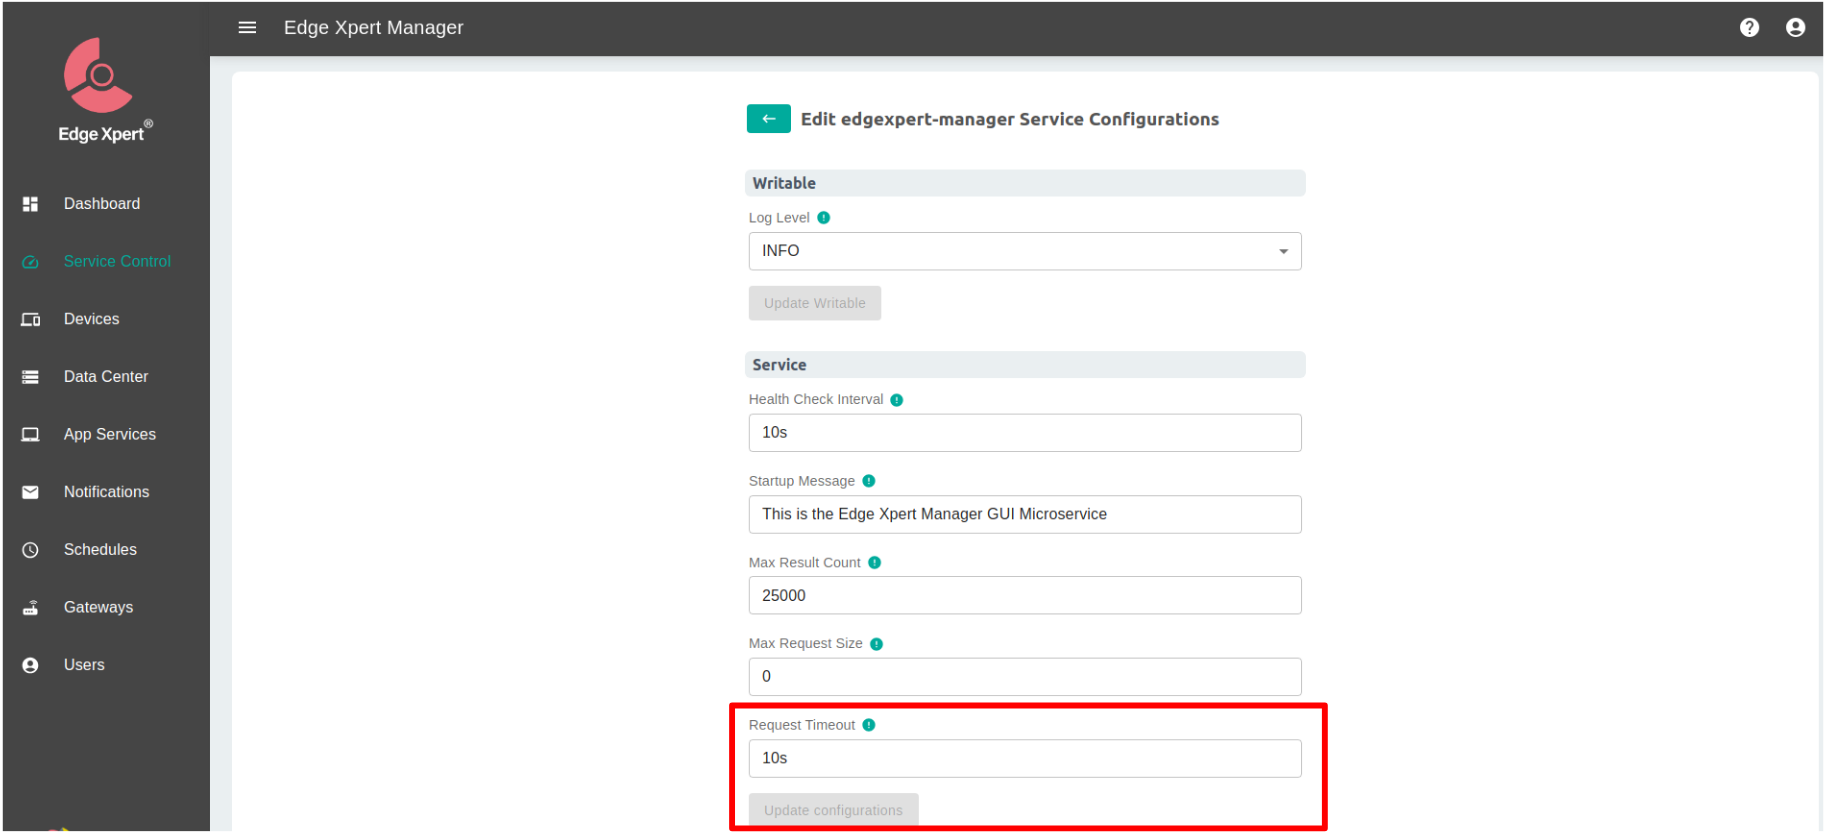
Since the default request timeout of xpert-manager is 10 seconds, it is possoble to run into the socket hang up error while importing large amount of devices or device resources which would require the latency time more than 10 seconds. If the number of devices is over 96,000, please refer to Service Control Page
View a Device using the Edge Xpert Manager
You can use the Device pane of Edge Xpert Manager to view detailed metadata of a device. This metadata includes the following:
- Device Name
- Description
- Operating State
- Admin State
- Labels
- Protocol
- Device Profile
- Device Service
- Defined Protocol properties
- Defined Auto Events for data collection
To view the metadata for a device, select ![]() from
the ACTION column for the device.
from
the ACTION column for the device.
For example, if you select ![]() for the Boolean device provided by the Virtual Device Service. The detailed metadata for the device displays, as illustrated below:
for the Boolean device provided by the Virtual Device Service. The detailed metadata for the device displays, as illustrated below:
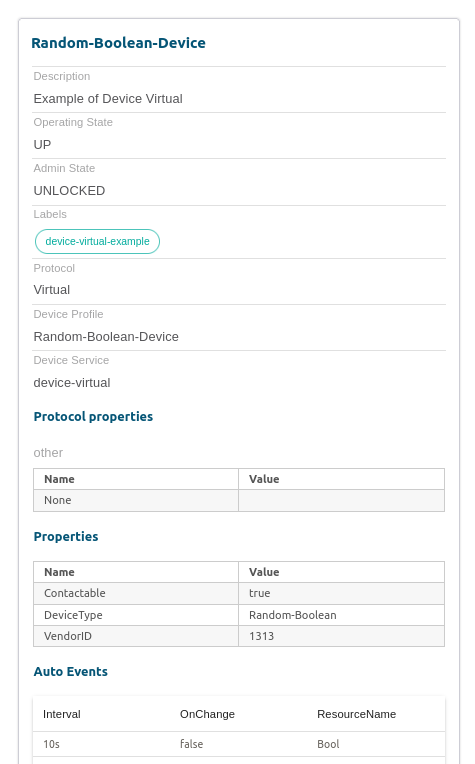
Use the scroll bar to move up and down the available metadata.
Edit a Device using the Edge Xpert Manager
You can change device information in the Edge Xpert Manager. For example, you might want to change the auto event rules.
To edit a device, complete the following steps:
-
Select Edit Device
from the Action column of the user account you want to change. -
You can change the following information for a device:
- Description
- Label
- Protocol Properties
- Device Profile
- Device Service
- Auto Events
-
Select Save. Selecting Cancel closes the Edit Device page without changing the device.
Delete a Device Using the Edge Xpert Manager
You can delete a device from the Devices pane of the Edge Xpert Manager.
To delete a device, complete the following steps:
-
Select Delete Device
from the Action column of the device -
Select Delete to delete the device. Selecting Cancel closes the dialog box without deleting the device
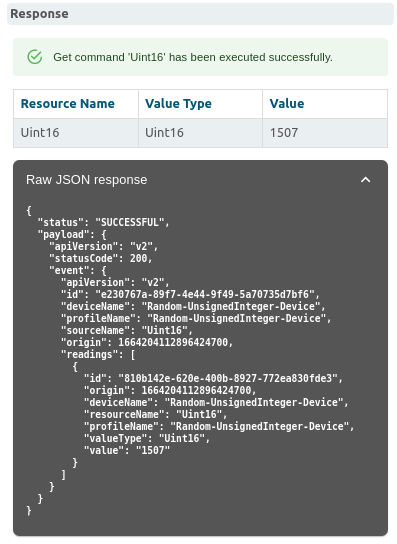
Read and Write Device Data using the Edge Xpert Manager
To read and write a device's current data values, select Control Device ![]() from the Action column for the device.
from the Action column for the device.
Reading Data
To read the data from a device, complete the following steps:
-
Choose your resource from the Command List, then select the Get Command option as illustrated below:

-
Select Execute button. The following response displays under the button:
Writing Data
Writable values are defined in the device profile and can be set by the user.
To write data to a device, complete the following steps:
-
Select your resource from the Command List, then select the Set Command option as illustrated below:
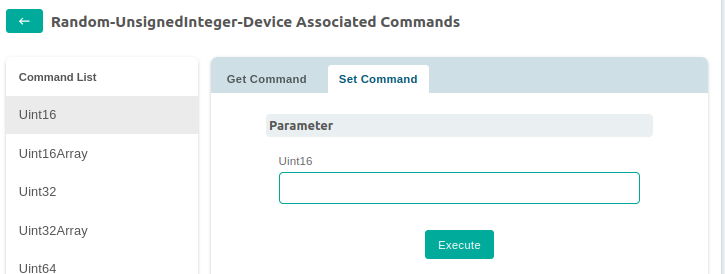
-
Input the value in the text box or select the toggle button. The input method is dependent on the selected command type.
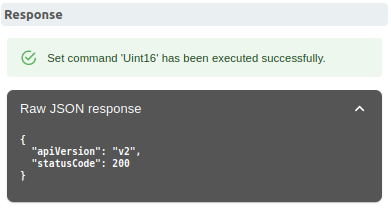
In the example, we selected Uint16 and input a number in text box.
-
Select Execute button. The following response displays under the button:
Lock or Unlock a Device in the Edge Xpert Manager
You can lock a device to prevent it from sending data and responding to Command requests. By default, devices are unlocked.
Devices can be locked or unlocked in Edge Xpert Manager on the Devices pane.
Locking a Device
To lock a specific device, complete the following steps:
-
Select the
 icon under the
 Admin Statecolumn for the device. The Change Admin Status dialog box displays -
Select Lock. Selecting the Cancel button closes the dialog box without locking the device
After selecting the Lock button, the
icon is replaced with - indicating that the device is now locked
Unlocking a Device
To unlock a device, complete the following steps:
-
Select the
icon from the Admin Statecolumn for the device. The Change Admin Status dialog box displays -
Select Unlock. Selecting the Cancel button closes the dialog box without unlocking the device
After selecting the Unlock button, the
icon is replaced with - indicating that the device is now unlocked