Export to Azure IoT Hub
Overview
Microsoft Azure IoT Hub is a cloud service that acts as a central message hub for communication between an IoT application and its attached devices. To send data to Azure IoT Hub, Edge Xpert provides a proprietary XpertMQTTExport function, which is similar to MQTTExport of EdgeX Foundry but with additional feature enhancements. This article will take you through steps to create an Edge Xpert application service to export data as generated by virtual device service to Azure IoT Hub.
Note
In Edge Xpert V2, AzureIOTHubMQTTSend function is replaced by XpertMQTTExport function.
Prerequisites
- Create an IoT Hub using the Azure portal
-
- For testing purpose only, you can generate X509 self-signed certificate rsa_cert.pem and key rsa_private.pem with OpenSSL by running the following command:
openssl req -x509 -sha1 -nodes -newkey rsa:2048 -keyout rsa_private.pem -days 365 -out rsa_cert.pem
- For testing purpose only, you can generate X509 self-signed certificate rsa_cert.pem and key rsa_private.pem with OpenSSL by running the following command:
-
Register the X.509 Certificate to the IoT Hub
- Sign in to Azure Portal, switch to your Azure IOT Hub and then add a certificate by uploading your certificate .pem or .cer file as generated on step 2.
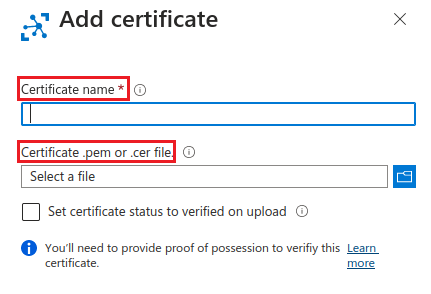
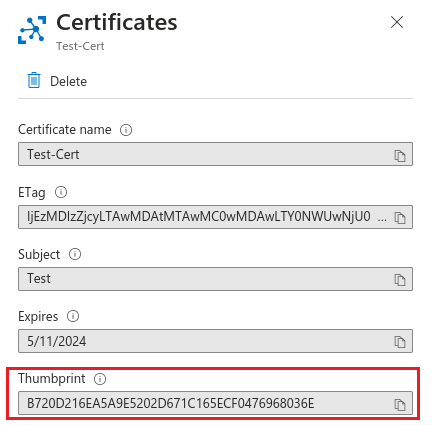
- Once your certificate .pem or .cer file has been successfully uploaded, copy its thumbprint, which is required when adding the IoT device.
-
Add a new device with X.509 authentication to the IoT Hub
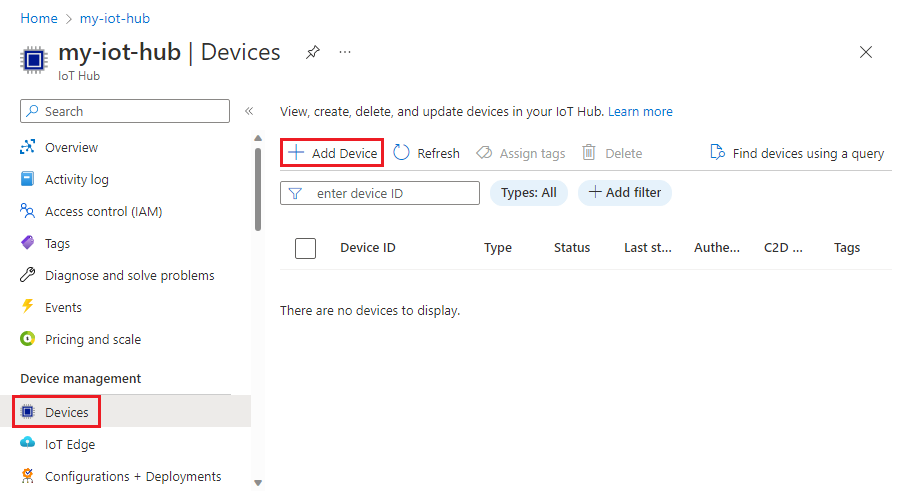
- In your IoT hub navigation menu, select Devices, then click on Add Device to add a device in your IoT hub.
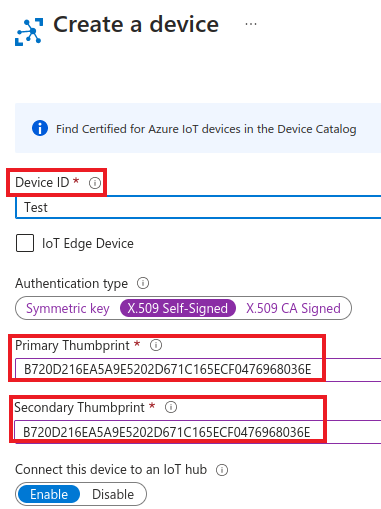
- In Create a device page, provide a name for your new device, choose X.509 Self-Signed as authentication type and provide the Thumbprint as obtained from previous step for both Primary Thumbprint and Secondary Thumbprint.
- Install Edge Xpert
- Launch Edge Xpert core services
Note
Make a note of the IoT Hub name, the device ID, and X.509 Certificate/Private Key. This information is needed later to configure the application service for authenticating with the Azure IoT Hub.
Sample Configuration
The following code defines the pipeline function XpertMQTTExport:
[Writable.Pipeline.Functions.XpertMQTTExport]
  [Writable.Pipeline.Functions.XpertMQTTExport.Parameters]
  ExportMode = "AzureIoTHub"
  BrokerAddress = "tls://{AzureIoTHubName}.azure-devices.net:8883"
  # If 8883 port is blocked in your network, please consider to use MQTT over Websocket to connect with Azure IoT
  # Hub via 443 port (comment above BrokerAddress and uncomment following BrokerAddress)
  #BrokerAddress = "wss://{AzureIoTHubName}.azure-devices.net:443/$iothub/websocket"
  Topic = "devices/{DeviceID}/messages/events/"
  ClientId = "{DeviceID}"
  SecretPath = "azure"
  AuthMode = "clientcert"
  Qos = "0"
  AutoReconnect = "false"
  Retain = "false"
  SkipVerify = "false"
  PersistOnError = "false"
The following table describes the configuration parameters used to define the pipeline function XpertMQTTExport to send data to Azure IoT Hub:
| Configuration | Mandatory | Description |
|---|---|---|
| ExportMode | Yes | Must specify AzureIoTHub to indicate that the data should be exported to Azure IoT Hub. |
| BrokerAddress | Yes | Specifies the MQTT broker address on the Azure IoT Hub. At the time of publication, Microsoft allows users to access Azure IoT Hub through MQTT protocol by using the broker address in the format below: tls://{AzureIoTHubName}.azure-devices.net:8883 Note that {AzureIoTHubName} is the name of the Azure IoT Hub as defined on Azure Portal. If port 8883 is blocked by your network, Microsoft also allows users to access Azure IoT Hub through MQTT over Websocket by using the broker address in the format below: wss://{AzureIoTHubName}.azure-devices.net:443/$iothub/websocket For further information, please refer to Azure Documentation. |
| Topic | Yes | Specifies the MQTT topic of Azure IoT Hub to publish the message to. At the time of publication, Azure IoT Hub requires device publish the messages to the topic as defined in the format below: devices/{DeviceID}/messages/events/ Note that {DeviceID} specifies the device Id as registered on Azure Portal. For further information, please refer to Azure Documentation. |
| ClientID | Yes | Specifies the Client ID to access Azure IoT Hub. At the time of publication, Azure IoT Hub requires the Client ID to be the device Id as registered on Azure Portal. For further information, please refer to Azure Documentation. |
| SecretPath | Yes | Specifies the path in the secret provider from which to retrieve the mandatory secrets--username, clientkey, and clientcert--to access Azure IoT Hub. At the time of publication, Azure IoT Hub requires the value of username to be in the format of {AzureIoTHubName}.azure-devices.net/{DeviceID}/?api-version=2021-04-12. The value of clientcert must be the content of certificate when you set up the X.509 security in Azure IoT Hub. The value of clientkey must be the private key when you set up the X.509 security in Azure IoT Hub. When the app service is running under secure mode, these secrets will be retrieved from Vault secret store; when the app service is running under insecure mode, these secrets will be retrieved from Writable.InsecureSecrets configuration. |
| AuthMode | Specifies the authentication mode used to connect to the Azure IoT Hub. At the time of publication, only clientcert is supported. |
|
| Qos | Specifies the Quality of Service (QoS) levels for the Azure IoT Hub MQTT connection. Note that Azure IoT Hub MQTT connection accepts only QoS 0 and 1. For further information about QoS, please refer to the MQTT specification.. |
|
| AutoReconnect | Specifies whether the connection is to be automatically reconnected if it is lost. | |
| Retain | Specifies the retain setting for the MQTT connection | |
| SkipVerify | Specifies whether the Edge Xpert Application Service verifies the server's certificate chain and host name. If set to true, TLS accepts any certificate presented by the server and any host name in that certificated. This means that TLS is susceptible to man-in-the middle attacks. Use this setting for testing purposes only. |
|
| PersistOnError | Specifies whether the events are stored for further attempts if any error is encountered during the message publication. Note: To use persistOnError, Store and Forward must be enabled in the Application Service configuration file. For further information on Store and Forward, refer to the Advanced Topics under the Application Functions SDK section of the EdgeX Foundry documentation.
|
Note
The application service can be running in either secure or insecure mode. When the app service is running under secure mode, secrets will be retrieved from Vault secret store; when the app service is running under insecure mode, secrets will be retrieved from Writable.InsecureSecrets configuration.
Configure an Application service to export events to Azure IoT Hub
- By end of step 4 in Prerequisites, users shall expect to obtain IoT Hub name, Device ID, and X.509 Certificate/Private Key. Keep a note on these values, as users will need these values to authenticate with Azure IoT Hub.
-
Edge Xpert offers a proprietary built-in function
XpertMQTTExportto send the events to Azure IoT Hub via MQTT, and the sample configuration is provided with Edge Xpert CLI utility. Once users complete the installation of Edge Xpert CLI utility, the sample configuration is available at/usr/share/edgexpert/examples/app-configurable/azureiothub-mqtt-export/. Copy and save the sample configuration file as a separate file, e.g. azureiothub-mqtt-export.toml, and then revise this configuration per values of IoT Hub Name, Device ID, and X.509 Certificate/Private Key as obtained earlier. For example, if users have IoT Hub Name:EdgeX, Device ID:TestDevice01, user shall reviseXpertMQTTExportwith following parameters:[Writable.Pipeline.Functions.XpertMQTTExport] [Writable.Pipeline.Functions.XpertMQTTExport.Parameters] ExportMode = "AzureIoTHub" BrokerAddress = "tls://EdgeX.azure-devices.net:8883" # If 8883 port is blocked in your network, please consider to use MQTT over Websocket to connect with Azure IoT # Hub via 443 port (comment above BrokerAddress and uncomment following BrokerAddress) #BrokerAddress = "wss://EdgeX.azure-devices.net:443/$iothub/websocket" Topic = "devices/TestDevice01/messages/events/" ClientId = "TestDevice01" SecretPath = "azure" AuthMode = "clientcert" Qos = "0" AutoReconnect = "false" Retain = "false" SkipVerify = "false" PersistOnError = "false"Note
Users will find two sample configuration files under
/usr/share/edgexpert/examples/app-configurable/azureiothub-mqtt-export/. If the application service will be running in insecure mode, useconfiguration-insecure.tomlas the sample. If the application service will be running in secure mode, useconfiguration-secretstore.tomlas the sample. -
If the application service will be launched under insecure mode, secrets will be retrieved from
Writable.InsecureSecretsconfiguration. Users will need to updateWritable.InsecureSecrets.azureconfiguration with correct values ofusername,clientcert, andclientkey:[Writable.InsecureSecrets.azure] path = "azure" [Writable.InsecureSecrets.azure.Secrets] # When using XpertMQTTExport and ExportMode="AzureIoTHub", username, clientcert and clientkey are mandatory secrets. username = "EdgeX.azure-devices.net/TestDevice01/?api-version=2021-04-12" clientcert = '''-----BEGIN CERTIFICATE----- MIIB2zCCAYKgAwIBAgIQSgMseWua/pRIZuBAyzIuCzAKBggqhkjOPQQDAjAoMSYw -----END CERTIFICATE-----''' clientkey = '''-----BEGIN PRIVATE KEY----- MIIEvAIBADANBgkqhkiG9w0BAQEFAASCBKYwggSiAgEAAoIBAQDBW5VXLmNugcKA -----END PRIVATE KEY-----'''Note
At the time of publication, Azure IoT Hub requires the value of
usernameto be in the format of{AzureIoTHubName}.azure-devices.net/{DeviceID}/?api-version=2021-04-12. The value ofclientcertmust be the content of certificate when you set up the X.509 security in Azure IoT Hub. The value ofclientkeymust be the private key when you set up the X.509 security in Azure IoT Hub. -
Once configuration is ready, users can launch the application service in secure mode using command below:
If users prefer to launch the application service in insecure mode, use command below:$ edgexpert up --secret app-service --path=<path of the confgiuration file>$ edgexpert up app-service --path=<path of the confgiuration file> -
If the application service is launched under secure mode on previous step, secrets will be retrieved from Vault secret store. Users need to add
username,clientkey, andclientcertinto Vault secret store. Please refer to EdgeX Foundry Storing Secrets for details about adding secrets into Vault secret store.Note
At the time of publication, Azure IoT Hub requires the value of
usernameto be in the format of{AzureIoTHubName}.azure-devices.net/{DeviceID}/?api-version=2021-04-12. The value ofclientcertmust be the content of certificate when you set up the X.509 security in Azure IoT Hub. The value ofclientkeymust be the private key when you set up the X.509 security in Azure IoT Hub.
Since Edge Xpert V2.1, IOTech recommends users to add secrets through the POST secrets REST API of application service. Follow steps below to add secrets under secure mode.
1. Inspect theIPAddressof the application service as launched in previous step:
2. Users may find it's difficult to properly add the content of X.509 PEM files in valid format in a REST request. Use following$ docker inspect --format='{{range .NetworkSettings.Networks}}{{.IPAddress}}{{end}}' app-configuration-secretstore 192.168.80.10awkcommands to convert the content of X.509 PEM files as a string:Make a note on the console output of both$ awk 'NF {sub(/\r/, ""); printf "%s\\n",$0;}' TestDevice01_rsa_cert.pem -----BEGIN CERTIFICATE-----\nMIIDgzCCAmugAwIBAgIUXvDwsS+pW/W+hMRp675EcXsYwIgwDQYJKoZIhvcNAQEF\n-----END CERTIFICATE-----\n $ awk 'NF {sub(/\r/, ""); printf "%s\\n",$0;}' TestDevice01_rsa_key.pem -----BEGIN PRIVATE KEY-----\nMIIEvAIBADANBgkqhkiG9w0BAQEFAASCBKYwggSiAgEAAoIBAQDBW5VXLmNugcKA\n-----END PRIVATE KEY-----\nawkcommands result.
3. Insert the copied string into the payload of REST call to add secrets. Note that all necessary secrets must be added in a single REST call, otherwise the secrets content will be overwritten by REST calls afterwards. For example, followingcurlcommand adds three secrets--username,clientcert, andclientkey--under the secret pathazurein the Vault secret store:curl -k -X POST -d '{ "apiVersion": "v2", "path": "azure", "secretData": [ {"key":"username","value":"EdgeX.azure-devices.net/TestDevice01/?api-version=2021-04-12" },{"key":"clientcert","value":"-----BEGIN CERTIFICATE-----\nMIIDgzCCAmugAwIBAgIUXvDwsS+pW/W+hMRp675EcXsYwIgwDQYJKoZIhvcNAQEF\n-----END CERTIFICATE-----\n"},{"key":"clientkey","value":"-----BEGIN PRIVATE KEY-----\nMIIEvAIBADANBgkqhkiG9w0BAQEFAASCBKYwggSiAgEAAoIBAQDBW5VXLmNugcKA\n-----END PRIVATE KEY-----\n"}]}' http://192.168.80.10:59700/api/v2/secret -
Now, an application service is up and ready to export events to Azure IoT Hub. To simulate the device sending readings from southbound, start up the virtual device service in secure mode using command below:
If users prefer to launch the virtual device service in insecure mode, use command below:$ edgexpert up --secret device-virtual$ edgexpert up device-virtual -
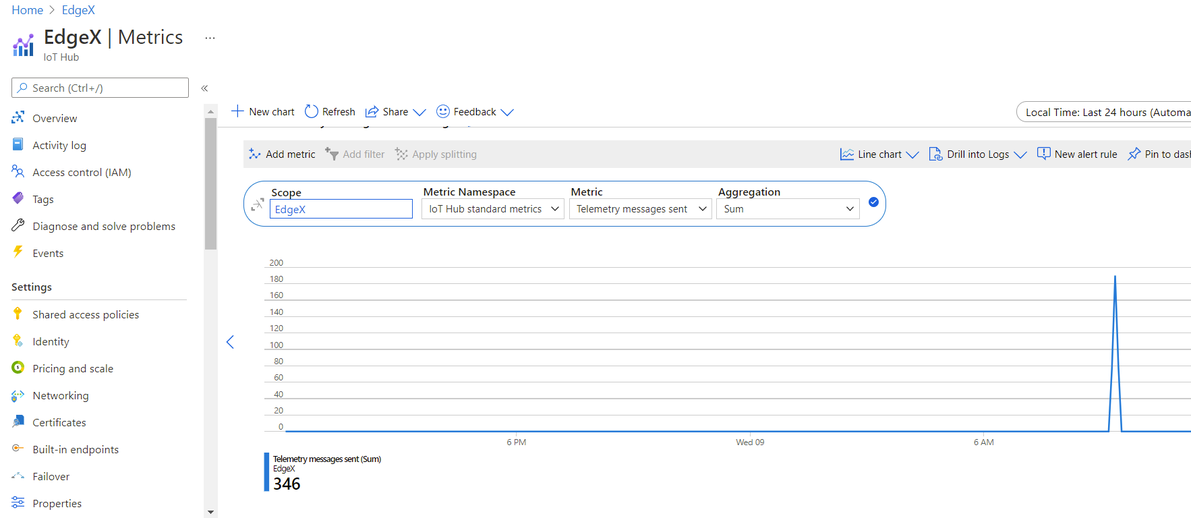
Azure IoT Hub allows users to see the number of sent messages. To do this in the Azure Portal, select Metrics from the Monitor menu options. Select Telemetry messages sent in the Metrics drop-down menu to see the number of sent messages:
- If users would like to examine messages as received by Azure IoT Hub, please install Visual Studio Code and the Azure IoT Hub extension. After installation, right-click on the target device, and then choose Start Monitoring Built-In Event Endpoint. Ideally, users should expect to see similar messages as shown below in the Output window:
[IoTHubMonitor] [5:01:50 PM] Message received from [TestDevice01]:
{
  "apiVersion": "v2",
  "id": "3a2fe106-1c21-4b55-a729-89b012433f9d",
  "deviceName": "Random-Boolean-Device",
  "profileName": "Random-Boolean-Device",
  "sourceName": "Bool",
  "origin": 1646643709904223500,
  "readings": [
    {
      "id": "f0609e1d-e182-49f5-b07b-99ebb7d2b9af",
      "origin": 1646643709904223500,
      "deviceName": "Random-Boolean-Device",
      "resourceName": "Bool",
      "profileName": "Random-Boolean-Device",
      "valueType": "Bool",
      "value": "true"
    }
  ]
}