Context Variable
Overview
This page describes how to configure an application service to read tags information from the cached device profiles and store to AppFunctionContext. Furthermore, you can use the MQTT (or HTTP) export function with a topic (or URL) with placeholders that can be replaced by the values stored in AppFunctionContext. This gives you some flexibility when designing the MQTT topic (or HTTP URL) for your solution.
Prerequisites
-
Understand Edge Xpert Application Service.
-
Launch required services.
edgexpert up --secret sys-mgmt device-virtual xpert-manager -
Navigate to
localhost:9090in a web browser. The default username/password is admin/admin. In the following steps, you will use Edge Xpert Manager to upload a device profile, create a device and add an Application service.
Create a virtual device to generate readings
- Download this device profile and upload it to metadata using Edge Xpert Manager.
In this device profile, the resource
Switchdefinition contains two tags:locationandcolor. - Add a device using Edge Xpert Manager
-
Choose
Virtualprotocol.
-
Select the profile uploaded in step 1 for Device Profile.

-
Select
VirtualDevicefor Device Service.
-
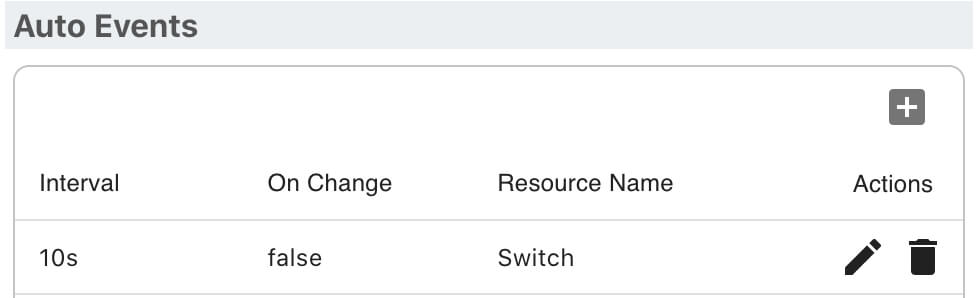
Define an Auto Event for collecting data from the device.
Add a new Application Service to export data to the built-in MQTT broker
-
Navigate to App Service page. Select the Add App Service (+) button.

-
Enter a service name.

-
Enter the address of the built-in MQTT broker, i.e.
tcp://mqtt-broker:1883
-
Enter a topic with some placeholders. For example:
/{location}/{color}/{devicename}/{sourcename}}
-
Enable filter and add the virtual device to Device filter.

-
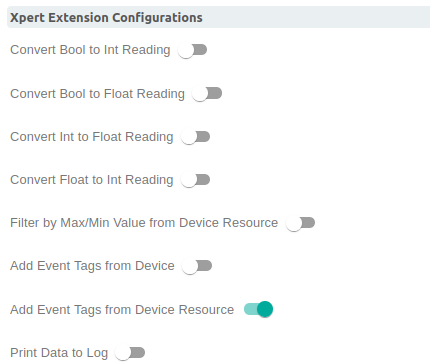
Enable the
Add Event Tags from Device Resourceoption.Note
When this option is enabled, App Service will read tags from the cached device profile and add them to the Event to be sent.
-
Set Context Variables
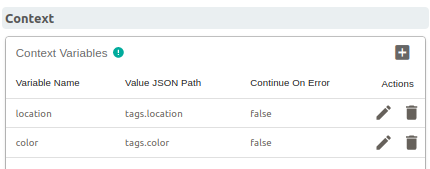
Note
The variable names must be the same as the placeholders in the topic. App Service will extract values from the Event per the specified JSON path expression and store them in the AppFunctionContext for access within the functions-pipeline execution. Before sending data, the MQTT and HTTP export functions will try to replace the placeholders of the form
{context-key-name}in the topic and URL with the value found in the AppFunctionContext atcontext-key-name. Key matching is case-insensitive.Note
devicename,profilename,sourcenameandreceivedtopicare reserved variable names.For example, below is an event data of the virtual device.
In step 5, the{ "apiVersion": "v2", "requestId": "0d47bd99-e383-4d71-aee5-9295267edc58", "event": { "apiVersion": "v2", "id": "3026d26d-0d34-450d-83a7-a1dca3af62ef", "deviceName": "SimpleDevice", "profileName": "SimpleDevice", "sourceName": "Switch", "origin": 1644927184492353560, "readings": [ { "id": "29694bfb-361f-4763-b464-9341caffb7a5", "origin": 1644927184492353560, "deviceName": "SimpleDevice", "resourceName": "Switch", "profileName": "SimpleDevice", "valueType": "Bool", "value": "false" } ] } }Add Event Tags from Device Resourceoption is enabled therefore the event with tags as shown below:To extract the{ "apiVersion": "v2", "requestId": "0d47bd99-e383-4d71-aee5-9295267edc58", "event": { "apiVersion": "v2", "id": "3026d26d-0d34-450d-83a7-a1dca3af62ef", "deviceName": "SimpleDevice", "profileName": "SimpleDevice", "sourceName": "Switch", "origin": 1644927184492353560, "readings": [ { "id": "29694bfb-361f-4763-b464-9341caffb7a5", "origin": 1644927184492353560, "deviceName": "SimpleDevice", "resourceName": "Switch", "profileName": "SimpleDevice", "valueType": "Bool", "value": "false" } ], "tags": { "location": "a0", "color": "red" } } }locationtag value the JSON path expression will betags.location
For quick overview of the JSON path syntax, refer to JSON path syntax.
For further information on Context Variable, refer to SetContextVariable.
-
Select Save to create the App service.
-
Now the App Service just created will start publishing the readings of the virtual device to the built-in MQTT broker on topic
/a0/red/SimpleDevice/Switch.
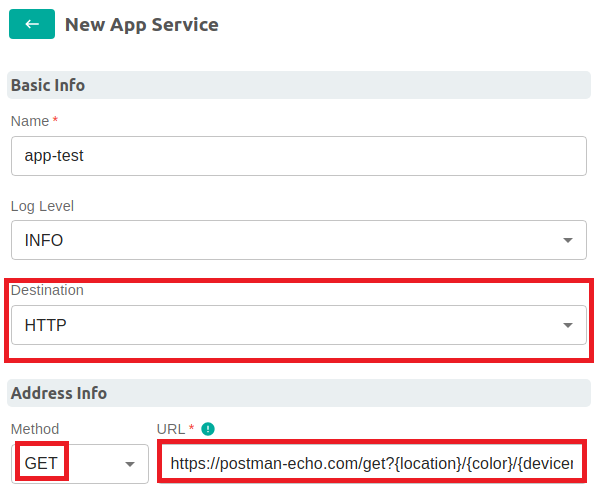
Add a new Application Service to export data via HTTP
The details are the same as Add a new Application Service to export data to the built-in MQTT broker except for the URL definition which is shown below:
http://www.example.com/{location}/{color}/{devicename}/{sourcename}
The following example using Postman Echo as the HTTPExport destination.
Note
This example will send data to Postman Echo, which is a service used to test REST clients.
-
Create a virtual device to generate readings as previous steps
-
Navigate to App Service page. Select HTTP as the destination and the URL definition as below and the rest of steps are the same as Add a new Application Service to export data to the built-in MQTT broker
https://postman-echo.com/get?{location}/{color}/{devicename}/{sourcename}