Create and Manage Digital Twins
To integrate Azure Sphere devices with Azure Digital Twins, you must first create Digital Twins instance and create an Azure Digital Twin Cloud Resource, as described in the following:
- Create Digital Twins Instance below
- Export Digital Twins Changes below
- Send Digital Twin Changes to IoT Hub below
You must also add a Digital Twin to the Azure Digital Twin Cloud Resource, as described in the following:
- Add a Digital Twin below
Note
You must setup the Azure Cloud for Digital Twins, as described in Set Up Azure Cloud and Setup Azure Cloud for Digital Twins before integrating Azure Sphere devices with Azure Digital Twins.
Create Digital Twins Instance
You can create a Digital Twins instance using the Azure portal or the Azure CLI. For further information on creating Digital Twins, refer to the following sections of the Azure documentation:
- Create the Azure Digital Twins instance
- Set up an Azure Digital Twins instance and authentication (CLI)
Export Digital Twins Changes
To export Digital Twins changes, you must create the following in the order specified:
- Event Grid Topic
- Digital Twin Endpoint
- Digital Twin Event Route
- Event Grid Topic Subscription
For this example, complete the following steps to export Digital Twins changes:
-
Create an Event Grid Topic, using the following command, where <location> is the Region and <iot-hub-name> is the name of your IoT Hub, <event-grid-topic-name> is the name of the of the Event Grid Topic and <resource-group-name> is the name of the resource group:
az eventgrid topic create \ --location <location> \ --name <event-grid-topic-name> \ --resource-group <resource-group-name> -
Create a Digital Twin Endpoint, using the following command, where <digital-twins-name> is the name of the Digital Twins, <resource-group-name> is the name of the resource group, and <event-grid-topic-name> is the name of the of the Event Grid Topic:
az dt endpoint create eventgrid \ --dt-name <digital-twins-name> \ --endpoint-name dt-output \ --eventgrid-resource-group <resource-group-name> \ --eventgrid-topic <event-grid-topic-name> -
Create a Digital Twin Event Route, using the following command, where is the <digital-twins-name> is the name of the of the Digital Twin Event Route:
az dt route create \ --dt-name <digital-twins-name> \ --endpoint-name dt-output \ --route-name dt-output-route \ --filter "type = 'microsoft.iot.telemetry' \ OR type = 'Azure.DigitalTwins.Relationship.Delete' \ OR type = 'Azure.DigitalTwins.Relationship.Update' \ OR type = 'Azure.DigitalTwins.Relationship.Create' \ OR type = 'Microsoft.DigitalTwins.Twin.Delete' \ OR type = 'Microsoft.DigitalTwins.Twin.Update' \ OR type = 'Microsoft.DigitalTwins.Twin.Create'" -
Create an Event Grid Topic Subscription to send events to the TwinToDevice Azure Function as follows:
az eventgrid topic show \ --name <event-grid-topic-name> \ --resource-group <resource-group-name> | jq '.id'-
Collect the Azure Function Endpoint path, using the following command, where <function-app-name> is the Azure Function ID and <resource-group-name> is the name of the resource group:
az functionapp function show \ --name <function-app-name> \ --function-name TwinToDevice \ --resource-group <resource-group-name> | jq '.id' -
Create a System Topic Event Subscription using the Source Resource ID and Azure Function Endpoint returned from the previous commands, using the following command, where <source-resource-id> is the Source Resource ID and <azure-function-id> is the Azure Function Endpoint path returned from the previous commands:
az eventgrid event-subscription create \
--name dt-output-sub \
--source-resource-id <source-resource-id> \
--endpoint <azure-function-id> \
--endpoint-type azurefunction
-
Send Digital Twin Changes
The TwinToDevice Azure Function is triggered by the XRT dt-output-sub Event Subscription when any changes occur on a Digital Twin. A digital Twin has a device_twin_id property, which specifies the device on the IoT Hub on which to invoke a Direct Method and the included changes from the Digital Twin.
To allow the TwinToDevice Azure Function to connect to an IoT Hub, a connection string must be created and provided to the Azure Function using an environment variable.
To create a connection string and provide it to the IoT Hub, complete the following steps:
-
Create a shared access policy, using the following command, where <iot-hub-name> is the name of your IoT Hub:
az iot hub policy create \ --hub-name <iot-hub-name> \ --name dt-azure-func-policy \ --permissions ServiceConnect -
Format the connection string
An IoT Hub connection string consists of the following values:
- HostName
- SharedAccessKeyName
- SharedAccessKey
You can format the connection string, using the following command, where <iot-hub-name> is the name of your IoT Hub, and <dt-azure-func-policy-key> is the primary shared key returned from the previous command:
HostName=<iot-hub-hostname>;SharedAccessKeyName=dt-azure-func-policy;SharedAccessKey=<dt-azure-func-policy-key> -
Create the
IOTHUB_CONNECTION_STRINGenvironment variable and set it to the connection string, using the following command, where <function-app-name> is the Azure Function ID, <resource-group-name> is the name of the resource group, and <iot-hub-connection-string> is the connection string that you formatted in the previous command:az functionapp config appsettings set \ --name <function-app-name> \ --resource-group <resource-group-name> \ --settings "IOTHUB_CONNECTION_STRING=HostName=<iot-hub-connection-string>"
Add a Digital Twin
The following example illustrates how to add a Digital Twin to your Azure Digital Resource. This example uses a device profile, or DTDL Model, for a Modbus Damocles2-Mini device. The full example of using a Modbus device is available from Use the Example Code.
You can use your own DTDL Model, which can be created using IOTech's Device Configuration Tool, and use the steps in the example as a guide.
The Damcoles2-Mini.dtdl file is as follows:
{
"@id": "dtmi:com:iotechsys:damocles2_mini;2",
"@type": "Interface",
"@context": "dtmi:dtdl:context;2",
"displayName": "Damocles2 Mini",
"description": "Damocles2 Mini",
"contents": [
 {
  "@type": "Telemetry",
  "name": "BinaryInput1",
  "schema": "boolean",
  "description": "Current value of binary input 1"
 },
 {
  "@type": "Telemetry",
  "name": "BinaryInput2",
  "schema": "boolean",
  "description": "Current value of binary input 2"
 },
 {
  "@type": "Telemetry",
  "name": "BinaryInput3",
  "schema": "boolean",
  "description": "Current value of binary input 3"
 },
 {
  "@type": "Telemetry",
  "name": "BinaryInput4",
  "schema": "boolean",
  "description": "Current value of binary input 4"
 },
 {
  "@type": "Property",
  "name": "BinaryOutput1",
  "schema": "boolean",
  "description": "Current value of output 1",
  "writable": true
 },
 {
  "@type": "Property",
  "name": "BinaryOutput2",
  "schema": "boolean",
  "description": "Current value of output 2",
  "writable": true
 },
 {
  "@type": "Property",
  "name": "device_twin_id",
  "schema": "string",
  "description": "Device digital twin ID"
 }
 ]
}
Using the Azure CLI
To add a Digital Twin using the Azure CLI, complete the following steps:
-
Upload the DTDL Model, using the following command:
az dt model create \ --dt-name <digital-twin-resource> \ --models Damocles2-Mini.dtdl -
Create a Digital Twin, using the uploaded DTDL Model, using the following command:
az dt twin create \
--dt-name <digital-twin-resource> \
--dtmi "dtmi:com:iotechsys:damocles2mini;2" \
--twin-id damocles-mini1 \
--properties '{"BinaryOutput1": false, "BinaryOutput2": false, "device_twin_id": "<YourAzureSphere Device ID>"}'
Note
Digital Twin definitions that are created using the Device Configuration Tool include a generated device_twin_id property. This property is used to route changes made to the Digital Twin back to the corresponding device. It must be set to the device twin identity for the Azure Sphere device running XRT that is connected to the device that corresponds to the Digital Twin.
Test with XRT
To test XRT with Azure, you can change a property of the Damocles2-Mini Digital Twin, using the following command:
az dt twin update \
--dt-name <digital-twin-resource> \
--twin-id damocles-mini1 \
--json-patch '{"op":"replace", "path":"/BinaryOutput1", "value": true}'
Using the Explorer Tool
The Azure Digital Twin Explorer allows you to manage Digital Twins that are stored in the Cloud on an Azure Digital Twin instance.
This tool can be deployed locally or to the cloud, as described below.
Local Deployment
Before using the Explorer tool, you must do the following:
-
Clone the tool from GitHub using the following command:
git clone https://github.com/Azure-Samples/digital-twins-explorer.git -
Build and run the tool, using the following commands:
cd digital-twins-explorer/client/src
npm install
npm run start
If a browser does not open when you have completed these steps, open a browser and navigate to
http://localhost:3000. You are prompted for the URL of the Azure Digital Twins. -
Enter the hostname of your Azure Digital Twin Resource, which can be found on the Azure Portal page for the Azure Digital Twin Resource
Cloud Deployment
For further information on deploying the Digital Twin Exporer to the Cloud, refer to the Running in the cloud section of the Digital Twins Explorer GitHub repository.
When you have completed the instructions to set up the Explorer tool, complete the following steps:
-
Open the Explorer tool in a browser using the appropriate URL
You are prompted for the URL of the Azure Digital Twins.
-
Enter the hostname of your Azure Digital Twin Resource, which can be found on the Azure Portal page for the Azure Digital Twin Resource
Add Digital Twin
To add a Digital Twin using the Explorer tool, complete the following steps:
-
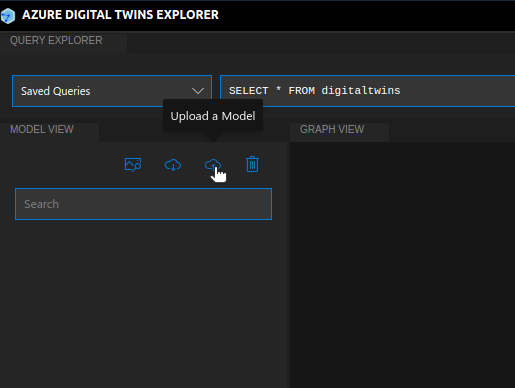
Upload the Damocles2-Mini DTDL model for the Digital Twin, as illustrated below:
-
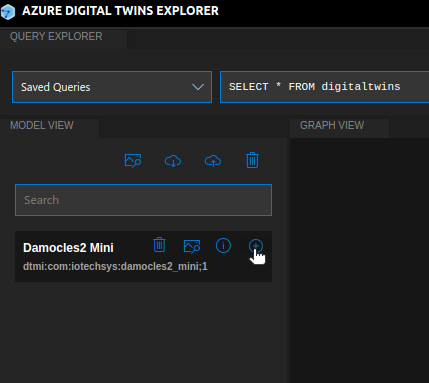
Create a Digital Twin with the uploaded model, as illustrated below:
-
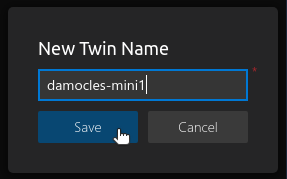
Enter a name for the Digital Twin, as illustrated below:
Note
Digital Twin definitions that are created using the Device Configuration Tool include a generated
device_twin_idproperty. This property is used to route changes made to the Digital Twin back to the corresponding device. It must be set to the device twin identity for the Azure Sphere device running XRT that is connected to the device that corresponds to the Digital Twin. -
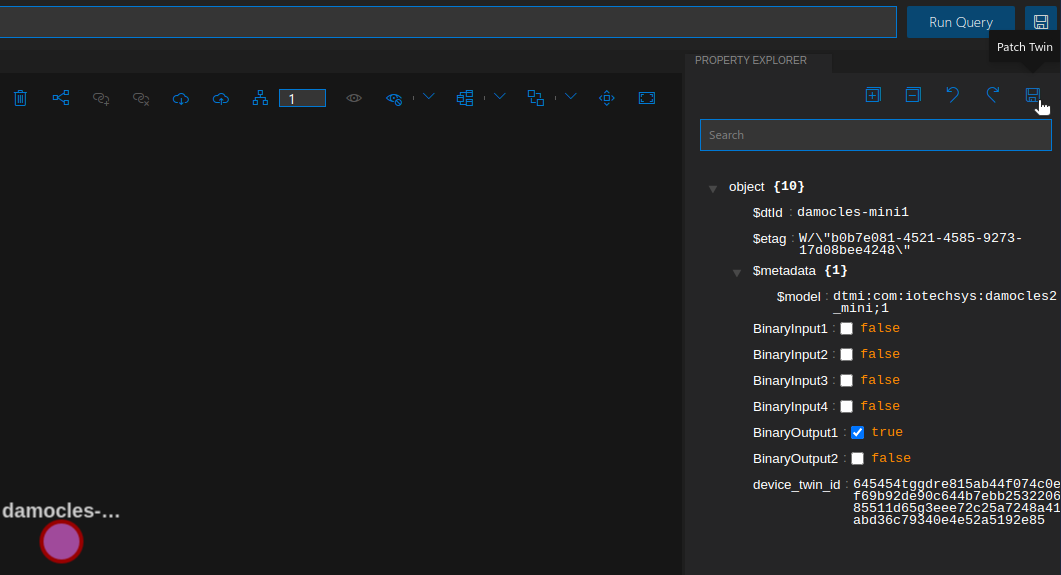
Set the
device_twin_idvalue to the ID of your Azure Sphere board on IoT Hub, as illustrated below: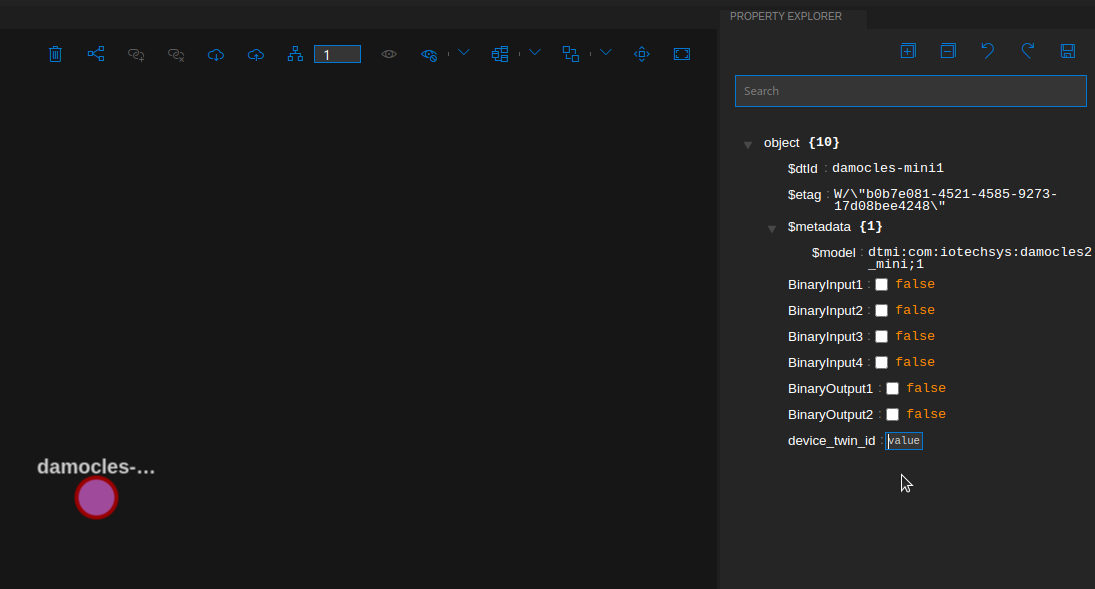
-
Select the Patch Twin icon in the top right corner to apply the Device Twin ID to the Digital Twin, as illustrated below:

Test with XRT
To test XRT with the Explorer tool, you can change the value of BinaryOutput1 to true, then select the Patch Twin icon in the top right corner, as illustrated below: